Guide to High Level Interface
There are two library modules, CommandLib and MessageLib, that provide high- and-low-level application
programming interfaces (APIs), respectively, that can be used for Python scripting or custom application development.
The high-level API is provided through an API class with methods that are very similar to the commands available in the DataFed command-line interface (CLI). Unlike the CLI, the API methods are functions that accept Python parameters and return reply messages (as Python objects) instead of text or JSON.
The low-level API, as the module name implies, exposes the binary message-passing interface used by DataFed and is intended for more complex applications. A user guide to the low-level API currently does not exist but will be provided in the future.
Note
While not not recommended for general use, there is a CLI library module in the DataFed client package that implements
the DataFed CLI but also provides an accessible “command” function that allows text-based CLI commands to be executed directly
from a Python script (without requiring a system call).
This is a brief user guide that illustrates the usage of the high-level CommandLib Python API.
It is not meant to be an exhaustive tutorial on using CommandLib.
Instead, we cover functions in CommandLib that would be used in most data orchestration scripts and custom software based on DataFed.
Users are encouraged to refer to the extensive documentation of DataFed’s CommandLib.CLI class
for comprehensive information on all functions in the CommandLib.CLI class.
Getting Started
Users are recommended to follow the:
getting-started guide to get accounts, and allocations on DataFed
installation instructions to install and configure the DataFed Python package on the machine(s) where they intend to use DataFed
Note
Ensure that the Globus endpoint associated with the machine where you use DataFed is active.
Caution
Ensure that all DataFed Get and Put operations are within a directory that Globus has write access to.
Otherwise, you will notice a Permission Denied error in your data transfer task messages.
Import package
We start by importing just the API class within datafed.CommandLib as shown below.
We also import json to simplify the process of communicating metadata with DataFed.
import json # For dealing with metadata
import os # For file level operations
import time # For timing demonstrations
import datetime # To demonstrate conversion between date and time formats
from datafed.CommandLib import API
Create instance
Finally, we create an instance of the DataFed API class via:
df_api = API()
Assuming that the DataFed client has been installed and setup with local user credentials, and our default GlobusID has been
configured correctly, we can now use df_api to communicate with DataFed as an authenticated user. If not, refer back to
the installation instructions.
Note
In addition to supporting local user credentials for automatic log-in, the DataFed high level interface also provides functions for checking user authentication status and for logging users in or out using password credentials.
DataFed Responses & Projects
DataFed functions and responses
Typically, users would be working in the context of a DataFed Project
, which would have been created by the project’s principle investigator(s) or other administrators,
rather than the user’s own personal root collection.
First, let’s try to find projects we are part of using the projectList() function in DataFed:
plist_resp = df_api.projectList()
print(plist_resp)
(item {
   id: "p/abc123"
   title: "ABC123: Important Project"
   owner: "u/breetju"
 }
 item {
   id: "p/sns.dvs.1"
   title: "SNS BL-11A"
   owner: "u/stansberrydv"
 }
 item {
  id: "p/trn001"
  title: "TRN001 : DataFed Training"
  owner: "u/somnaths"
}
offset: 0
count: 20
total: 3
, 'ListingReply')
DataFed typically responds to functions with messages.
It is important to get comfortable with these messages and extracting information from them if one is interested in using this interface to automate data orchestration.
Let’s dig into this object layer-by-layer:
The first layer is typically a tuple of size 2:
type(pl_resp), len(pl_resp)
(tuple, 2)
This tuple usually contains two key objects:
a message containing the information requested from DataFed
the type of that message, which allows us to interpret the reply and parse its fields correctly – in this case, our message is in the form of a
'ListingReply'.
A simple check of the object type will confirm the type of our core Google Protocol Buffer message:
type(pl_resp[0])
google.protobuf.internal.python_message.ListingReply
ListingReply is one of a handful of different message types that DataFed replies with across all its many functions.
We will be encountering most of the different types of messages in this user guide.
Interested users are encouraged to read official documentation and examples about Google Protobuf.
Protobuf messages are powerful objects that not only allow quick access to the information stored in their defined fields, but are also nominally subscriptable and iterable in Python.
Subcripting message objects
Besides the main information about the different projects, this ListingReply also provides some contextual information
such as the:
count- Maximum number of items that could be listed in this message,total- Number of items listed in this messageoffset- The number of items in past listings - this denotes the concept of page numbers
Though we won’t be needing the information in this case, here is how we might get the offset:
pl_resp[0].offset
0
Accessing the item component produces the actual listing of projects in the message:
len(pl_resp[0].item)
3
Now, if we wanted to get the title field of the third project in the listing, we would access it as:
pl_resp[0].item[2].title
"TRN001 : DataFed Training"
Note
We will be accessing many fields in messages going forward. Users are recommended to revisit this section to remind themselves how to peel each layer of the message to get to the desired field since we will jump straight into using a single line of code to access the desired information henceforth in the interest of brevity.
Iterating through message items
Let’s say we wanted to print out ID and owner of each of the projects in the listing, we could iterate through the items as:
for proj in pl_resp[0].item:
    print(proj.id, '\t', proj.owner)
p/abc123        u/breetju
p/sns.dvs.1     u/stansberrydv
p/trn001        u/somnaths
Exploring projects
We can take a look at basic information about a project using the projectView() function:
df_api.projectView('p/trn001')
(proj {
  id: "p/trn001"
  title: "TRN001 : DataFed Training"
  desc: "DataFed Training project"
  owner: "u/somnaths"
  ct: 1610905375
  ut: 1610912585
  admin: "u/stansberrydv"
  admin: "u/breetju"
  alloc {
    repo: "cades-cnms"
    data_limit: 1073741824
    data_size: 0
    rec_limit: 1000
    rec_count: 0
    path: "/data10t/cades-cnms/project/trn001/"
  }
}
, 'ProjectDataReply')
Note that we got a different kind of reply from DataFed - a ProjectDataReply object.
The methodology to access information in these objects is identical to that described above.
Nonetheless, this response provides some useful information such as the administrators, creation date, etc.
that might be useful for those members or administrators of several projects.
Contexts, aliases & IDs
Just as people have various facets within their own life such as their personal and professional lives,
DataFed too offers similar capabilities via contexts.
Users in DataFed have their own Personal Data context as well as other contexts in the form of
Projects as we have seen above.
Default context
We can always ask DataFed what context it is using via the getContext() function:
print(df_api.getContext())
'u/somnaths'
As mentioned earlier, DataFed typically replies with a Google Protobuf message object.
However, getContext() is among the few functions where DataFed returns a simple string.
The return value from getContext() reveals that DataFed is assuming that we intend to work
within the User’s Personal Data.
Note
DataFed starts with its context set by default to the User’s Personal Data
rather than any project
Caution
Though the CommandLib interface of DataFed sets the default context to the User’s
Personal Data, it is necessary that the user have a valid data allocation
to create and store data in their Personal Data context.
There are two ways to set the context, one can set the context only within the scope of a function or simply reset the default scope.
Context per function
Every space in DataFed, regardless of whether it is a Project or the user’s own Personal Data
contains a Collection called root, which contains all other Data Records and Collections within this space.
Let us take a look at the root Collection in the Training project.
In order to look at the Collection, we will be using the collectionView() function.
We will be going over this specific function later in greater detail,
but will use it here to illustrate another concept.
Since we are interested in the root Collection within the context of the Training Project,
and not the User Personal Data which is the current (default) context,
we can specify the context for this function call using the context keyword argument as:
print(df_api.collectionView('root', context='p/trn001'))
(coll {
   id: "c/p_trn001_root"
   title: "Root Collection"
   alias: "root"
   desc: "Root collection for project trn001"
   owner: "p/trn001"
   notes: 0
 }, 'CollDataReply')
This function returns a different, yet somewhat similar response to that from the projectView() function - a CollDataReply object.
The desc field in the above response illustrates that,
we did in fact get information regarding the root Collection belonging to the Training project and not the user’s Personal Data space.
Let’s see what would have happened if we did not specify the context via the keyword argument:
print(df_api.collectionView('root'))
(coll {
   id: "c/u_somnaths_root"
   title: "root"
   desc: "Root collection for user Suhas Somnath (somnaths)"
   owner: "u/somnaths"
   notes: 0
 }, 'CollDataReply')
From the desc field in the above output, we observe that simply asking for root Collection returns information about the
user’s Personal data rather than the root Collection in Training project.
Contents of contexts
Now that we know how to get to the correct root Collection,
we can take a look at the contents of the project by listing everything in the project’s
root collection using the collectionItemsList() function as shown below:
ls_resp = df_api.collectionItemsList('root', context='p/trn001')
print(ls_resp)
(item {
   id: "c/34559341"
   title: "breetju"
   alias: "breetju"
   owner: "p/trn001"
   notes: 0
 }
 item {
   id: "c/34559108"
   title: "PROJSHARE"
   alias: "projshare"
   owner: "p/trn001"
   notes: 0
 }
 item {
   id: "c/34558900"
   title: "somnaths"
   alias: "somnaths"
   owner: "p/trn001"
   notes: 0
 }
 item {
   id: "c/34559268"
   title: "stansberrydv"
   alias: "stansberrydv"
   owner: "p/trn001"
   notes: 0
 }
 offset: 0
 count: 20
 total: 4, 'ListingReply')
Just as in the projectList() function, this function too returns a ListingReply message.
Here, we see that the administrator of the project has created some collections for the private
use of project members and a collaborative space called PROJSHARE
Note
Not all projects would be structured in this manner.
Alias vs ID
So far, we have been addressing the Collections via their alias - a human readable unique identifier.
Though aliases are indeed a convenient way to address items in DataFed, there are a few things to keep in mind:
Note
The alias for a Data Record or Collection is unique only within a user’s Personal Data or Project context.
One would need to supply the context when addressing a Record or Collection via its alias
Not supplying the context when addressing via an alias would result in an error:
df_api.collectionView('somnaths')
---------------------------------------------------------------------------
Exception                                 Traceback (most recent call last)
<ipython-input-20-acb948617f34> in <module>
----> 1 df_api.collectionItemsList('somnaths')

//anaconda/lib/python3.5/site-packages/datafed/CommandLib.py in collectionItemsList(self, coll_id, offset, count, context)
    757         msg.id = self._resolve_id( coll_id, context )
    758
--> 759         return self._mapi.sendRecv( msg )
    760
    761

//anaconda/lib/python3.5/site-packages/datafed/MessageLib.py in sendRecv(self, msg, timeout, nack_except)
    299         self.send( msg )
    300         _timeout = (timeout if timeout != None else self._timeout)
--> 301         reply, mt, ctxt = self.recv( _timeout, nack_except )
    302         if reply == None:
    303             return None, None

//anaconda/lib/python3.5/site-packages/datafed/MessageLib.py in recv(self, timeout, nack_except)
    343         if msg_type == "NackReply" and _nack_except:
    344             if reply.err_msg:
--> 345                 raise Exception(reply.err_msg)
    346             else:
    347                 raise Exception("Server error {}".format( reply.err_code ))

Exception: Alias 'somnaths' does not exist
(source: dbGet:126 code:1)
Note
All Data Records and Collections always have a unique alphanumeric identifier or ID even if the
user did not specify a human-friendly alias
An alternate way to address a Data Record or Collection is via its ID:
df_api.collectionView('c/34558900')
(coll {
   id: "c/34558900"
   title: "somnaths"
   alias: "somnaths"
   owner: "p/trn001"
   ct: 1610905632
   ut: 1610905667
   notes: 0
 }, 'CollDataReply')
We observe that we can successfully get information about an entity in DataFed using its ID.
Note
ID for Records, Collections, etc. in projects are unique across all of DataFed, and are not just
unique within a narrow scope such as within that of a Project or User’s space.
It is therefore unnecessary to provide the context when addressing an item via its unique ID.
However, one would need to carefully extract the (automatically generated) ID of the Collection or Data Record of interest from the DataFed response in order to use it in subsequent code within a script.
Caution
When working within the context of a Project with several collaborators,
there is a possibility that two users may use the same alias for a Record or a Collection.
Managing aliases within Projects:
There is no single solution to this problem. However, here are some suggestions:
Team members of the project should coordinate and collaboratively assign aliases
Individual members elect to avoid using aliases within the context of their personal Collections
Individual members manually prefix aliases for items within their personal Collections with their initials (hopefully unique within the Project)
Manual context management
In this user guide, we will work within the context of the training project. In order to ensure that we continue to work within this context - create data records, collections, etc. within this space, we need to ensure that we minimize ambiguity about the context.
A naive approach is to simply define a python variable and use it in every function call instead of manually specifying it as we have done above:
context = 'p/trn001' # DataFed ID for the training project
Note
Please change the context variable to suit your own project.
If you want to work within your own Personal Data space,
set context to None.
Caution
Accidentally forgetting to specify the context keyword argument in functions could
result in incorrect data management operations.
Set default context
Keeping track of and remembering to specify the context keyword argument for all
function calls can be tedious if one is surely going to be working within a single context.
In such cases, DataFed provides the setContext() function that allows the user to
specify the default context going forward:
df_api.setContext('p/trn001')
Note
setContext() is valid within the scope of a single python process.
The user would need to call the function each time they instantiate the DataFed CommandLib.API class
Now, one could operate on items within the project without having to specify the context
keyword argument. For example, running the same collectionView() function that failed earlier
would work now:
df_api.collectionView('somnaths')
(coll {
   id: "c/34558900"
   title: "somnaths"
   alias: "somnaths"
   owner: "p/trn001"
   ct: 1610905632
   ut: 1610905667
   notes: 0
 }, 'CollDataReply')
If we wanted to temporarily operate on a different context such as the user’s Personal Data,
we would need to specify the context keyword argument explicitly for those function calls.
Set working collection
In this specific case, the Project has been organized to provide each user with their own private collection.
We can use a python variable to help ensure that any Data Records or Collections we want to create in our
private space is created within our own collection (somnaths in this case) rather than
creating clutter in the root collection of the project:
dest_collection = 'somnaths' # Destination collection
Note
Please change the dest_collection variable to suit your own project.
If you want to work within the project’s root collection, set dest_collection to root.
Data Records
Prepare (scientific) metadata
DataFed can accept metadata as dictionaries in python or as a JSON file.
Here, we simply create a dictionary with fake metadata in place of the real metadata:
parameters = {
              'a': 4,
              'b': [1, 2, -4, 7.123],
              'c': 'Something important',
              'd': {'x': 14, 'y': -19} # Can use nested dictionaries
              }
Create Data Record
Until a future version of DataFed, which can accept a python dictionary itself instead
of a JSON file or a JSON string for the metadata, we will need to use json.dumps()
function to turn our python metadata dictionary parameters into a JSON string, or
write the dictionary to a JSON file:
dc_resp = df_api.dataCreate('my important data',
                            metadata=json.dumps(parameters),
                            parent_id=dest_collection, # parent collection
                            )
Here, the parent_id was set to the dest_collection variable, as this variable contains the alias of our
personal collection within the project, in which our data record will be created.
Leaving this unspecified is equivalent to the default value of root which means that
the Data Record would be created within the root collection of the project.
Extract Record ID
Let’s look at the response we got for the dataCreate() function call:
print(dc_resp)
(data {
   id: "d/34682319"
   title: "my important data"
   metadata: "{\"a\":4,\"b\":[1,2,-4,7.123],\"c\":\"Something important\",\"d\":{\"x\":14,\"y\":-19}}"
   repo_id: "repo/cades-cnms"
   size: 0.0
   ext_auto: true
   ct: 1611077217
   ut: 1611077217
   owner: "p/trn001"
   creator: "u/somnaths"
   parent_id: "c/34558900"
 }, 'RecordDataReply')
DataFed returned a RecordDataReply object, which contains crucial pieces of information regarding the record.
Note
In the future, the dataCreate() function would by default return only the ID of the record
instead of such a verbose response if it successfully created the Data Record.
We expect to be able to continue to get this verbose response through an optional argument.
Such detailed information regarding the record can always be obtained via the dataView() function.
Similar to getting the title from the project information, if we wanted to get the record ID to be used for later operations, here’s how we could go about it:
record_id = dc_resp[0].data[0].id
print(record_id)
'd/34682319'
Edit Record information
All information about Data Records, besides the unique ID, can be edited using the
dataUpdate() command. For example, if we wanted to change the title, add a human-readable
unique alias, and add to the scientific metadata, we would as follows:
du_resp = df_api.dataUpdate(record_id,
                            title='Some new title for the data',
                            alias='my_first_dataset',
                            metadata=json.dumps({'appended_metadata': True})
                            )
print(du_resp)
(data {
  id: "d/34682319"
  title: "Some new title for the data"
  alias: "my_first_dataset"
  repo_id: "repo/cades-cnms"
  size: 0.0
  ext_auto: true
  ct: 1611077217
  ut: 1611077220
  owner: "p/trn001"
  creator: "u/somnaths"
  notes: 0
}
update {
  id: "d/34682319"
  title: "Some new title for the data"
  alias: "my_first_dataset"
  owner: "p/trn001"
  creator: "u/somnaths"
  size: 0.0
  notes: 0
  deps_avail: true
}
, 'RecordDataReply')
Note
In the future, the dataUpdate() command would return only an acknowledgement
of the successful execution of the data update.
View Record information
Since the response from the dataCreate() and dataUpdate() functions does not include the
metadata, we can always get the most comprehensive information about Data Records via the dataView() function:
dv_resp = df_api.dataView(record_id)
print(dv_resp)
(data {
   id: "d/34682319"
   title: "Some new title for the data"
   alias: "my_first_dataset"
   metadata: "{\"a\":4,\"appended_metadata\":true,\"b\":[1,2,-4,7.123],\"c\":\"Something important\",\"d\":{\"x\":14,\"y\":-19}}"
   repo_id: "repo/cades-cnms"
   size: 0.0
   ext_auto: true
   ct: 1611077217
   ut: 1611077220
   owner: "p/trn001"
   creator: "u/somnaths"
   notes: 0
 }, 'RecordDataReply')
The date and time in the Data Records are encoded according to the Unix time format and
can be converted to familiar python datetime objects via fromtimestamp():
datetime.datetime.fromtimestamp(dv_resp[0].data[0].ct)
datetime.datetime(2021, 1, 19, 12, 26, 57)
Extract metadata
As the response above shows, the metadata is also part of the response we got from dataView().
By default, the metadata in the response is formatted as a JSON string:
print(dv_resp[0].data[0].metadata)
"{\"a\":4,\"appended_metadata\":true,\"b\":[1,2,-4,7.123],\"c\":\"Something important\",\"d\":{\"x\":14,\"y\":-19}}"
In order to get back a python dictionary, use json.loads()
print(json.loads(dv_resp[0].data[0].metadata))
{'a': 4,
 'appended_metadata': True,
 'b': [1, 2, -4, 7.123],
 'c': 'Something important',
 'd': {'x': 14, 'y': -19}}
We can clearly observe that both the original and the new metadata are present in the record.
Replace metadata
In the example above, we appended metadata to existing metadata, which is the default manner in which dataUpdate() operates.
If desired, we could completely replace the metadata by setting metadata_set to True as in:
du_resp = df_api.dataUpdate(record_id,
                            metadata=json.dumps({'p': 14, 'q': 'Hello', 'r': [1, 2, 3]}),
                            metadata_set=True,
                            )
dv_resp = df_api.dataView(record_id)
print(json.loads(dv_resp[0].data[0].metadata))
{'p': 14, 'q': 'Hello', 'r': [1, 2, 3]}
The previous metadata keys such as a, b, c, etc. have all been replaced by the new metadata fields.
Relationships and provenance
Let’s say that this first dataset went through some processing step which resulted in one or more new datasets. This processing step could be something as simple as a data cleaning operation or as complex as a multi-institutional cross-facility workflow. We could not only track the resultant new datasets as Data Records in DataFed but also the relationships between the datasets.
Note
We will cover topics related to associating raw data to Data Records in the next section.
First, we create Data Records as we have done earlier for the new datasets using the dataCreate() function:
dc2_resp = df_api.dataCreate('cleaned data',
                              metadata=json.dumps({'cleaning_algorithm': 'gaussian_blur', 'size': 20}),
                              parent_id=dest_collection, # parent collection
                             )
clean_rec_id = dc2_resp[0].data[0].id
print(clean_rec_id)
'd/34682715'
We can establish a relationship or dependency between the original / source Data Record and the subsequent Data Record
via several methods such as within the dataCreate() function call or via a subsequent dataUpdate() call.
Dependencies in DataFed are specified as a list of relationships, themselves specified as list objects,
wherein the first item in the list is the relationship type and the second item is the identifier of the related Data Record.
As of this writing, DataFed supports the following relationships:
der- Is derived fromcomp- Is comprised ofver- Is new version of
For our example, we will say that our new Record is derived from our original record via the dataUpdate() function:
dep_resp = df_api.dataUpdate(clean_rec_id, deps_add=[["der", record_id]])
print(dep_resp)
(data {
   id: "d/34682715"
   title: "cleaned data"
   repo_id: "repo/cades-cnms"
   size: 0.0
   ext_auto: true
   ct: 1611077405
   ut: 1611078386
   owner: "p/trn001"
   creator: "u/somnaths"
   deps {
     id: "d/34682319"
     alias: "my_first_dataset"
     type: DEP_IS_DERIVED_FROM
     dir: DEP_OUT
   }
   notes: 0
 }
 update {
   id: "d/34682715"
   title: "cleaned data"
   owner: "p/trn001"
   creator: "u/somnaths"
   size: 0.0
   notes: 0
   deps_avail: true
   dep {
     id: "d/34682319"
     alias: "my_first_dataset"
     type: DEP_IS_DERIVED_FROM
     dir: DEP_OUT
   }
 }, 'RecordDataReply')
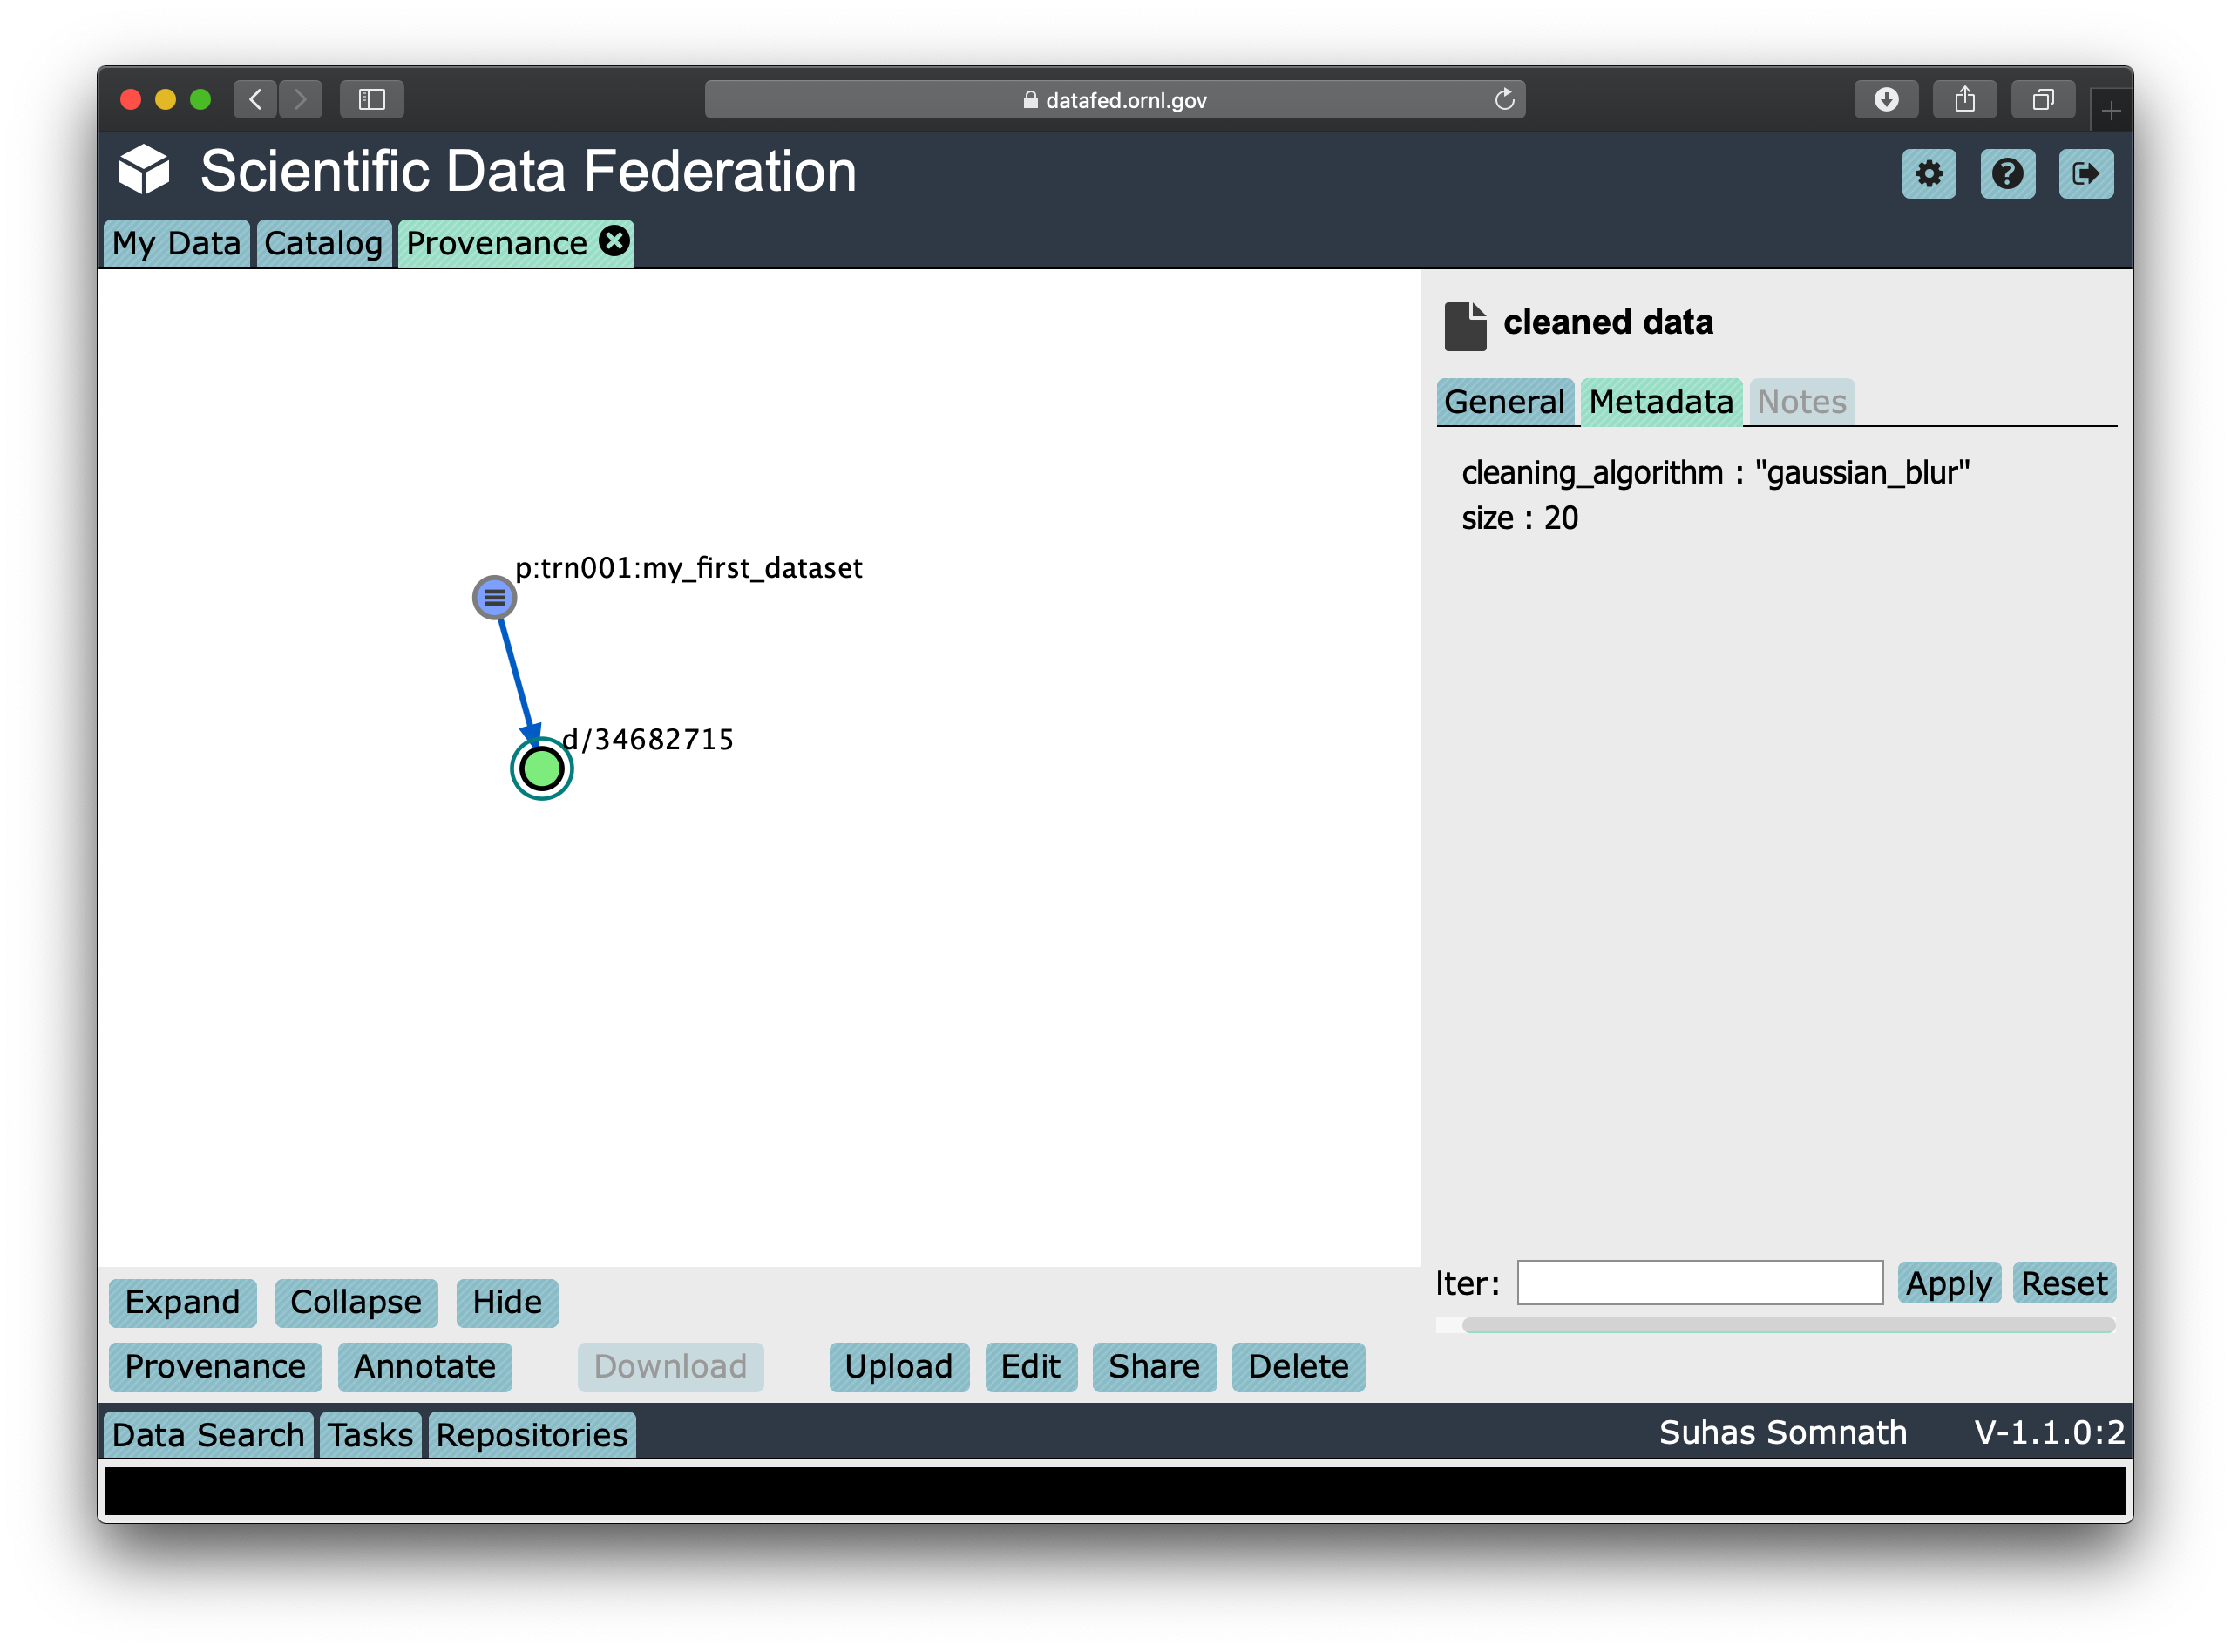
The response shows that we did in fact manage to establish the DEP_IS_DERIVED_FROM relationship.
In the DataFed web interface, when one selects either the original or derived Records and
clicks on the Provenance view, we will observe that there is an
arrow originating from the original Data Record and terminating into the newly created Data Record:
Batch operations
DataFed has the dataBatchCreate() and dataBatchUpdate() functions to facilitate
the creation and editing of multiple Data Records in one shot.
Other functions
DataFed also offers the dataDelete() function for the deletion of one or more Data Records
Data Transfer
Upload raw data
So far, the Data Record created above only contains simple text information along with the scientific metadata. It does not have the raw data that we colloquially refer to as “data” in science.
For the sake of demonstration, we will just use the metadata as the data itself:
with open('parameters.json', mode='w') as file_handle:
    json.dump(parameters, file_handle)
With the data file created, we are ready to put this raw data into the record we created above.
Note
The raw data file must be located such that it is visible to the (default) Globus endpoint. To configure the default endpoint, follow the steps detailed towards the end of the installation instructions.
Note
Ensure that the Globus endpoint that will be used for uploading data is active.
put_resp = df_api.dataPut(record_id,
                          './parameters.json',
                          wait=True, # Waits until transfer completes.
                          )
print(put_resp)
(item {
   id: "d/34682319"
   title: "Some new title for the data"
   size: 0.0
   owner: "p/trn001"
 }
task {
   id: "task/34702491"
   type: TT_DATA_PUT
   status: TS_SUCCEEDED
   client: "u/somnaths"
   step: 3
   steps: 4
   msg: "Finished"
   ct: 1611102437
   ut: 1611102444
   source: "olcf#dtn/gpfs/alpine/stf011/scratch/somnaths/DataFed_Tutorial/parameters.json"
   dest: "d/34682319"
 }, 'DataPutReply')
The dataPut() method initiates a Globus transfer on our behalf
from the machine where the command was entered to wherever the default data repository is located.
Note
The above data file was specified by its relative local path, so DataFed used our pre-configured default Globus endpoint to find the data file. As long as we have the id for any active Globus endpoint that we have authenticated access to, we can transfer data from that endpoint with its full absolute file path – even if the file system is not attached ot the local machine. Look for more information on this in later examples.
In addition, the dataPut() method prints out the status of the Globus transfer as shown under the task section of the response.
The task msg shows that the Globus transfer succeeded. The transfer succeeded before the message was returned because
the wait keyword argument in the dataPut() method was set to True, meaning that we requested that DataFed not proceed
until the Globus transfer was completed.
This is not the default behavior of dataPut() or dataGet().
In a later section, we will go over an example usecase wherein asynchronous transfers may be preferred.
Let’s view the Data Record we have been working on so far:
dv_resp = df_api.dataView(record_id)
print(dv_resp)
(data {
   id: "d/34682319"
   title: "Some new title for the data"
   alias: "my_first_dataset"
   metadata: "{\"p\":14,\"q\":\"Hello\",\"r\":[1,2,3]}"
   repo_id: "repo/cades-cnms"
   size: 86.0
   source: "olcf#dtn/gpfs/alpine/stf011/scratch/somnaths/DataFed_Tutorial/parameters.json"
   ext: ".json"
   ext_auto: true
   ct: 1611077217
   ut: 1611077286
   dt: 1611077286
   owner: "p/trn001"
   creator: "u/somnaths"
   notes: 0
 }, 'RecordDataReply')
Comparing this response against the response we got from the last dataView() call,
you will notice the source and file extension have been updated.
Download raw data
DataFed is also capable of getting data stored in a DataFed repository and placing it in the
local or other Globus-visible filesystem via the dataGet() function.
For demonstration purposes, we will simply download the raw data (.JSON file) that was placed into the first Data Record.
In order to avoid clashes in file-naming, dataGet() names the downloaded file by the unique ID of the Data Record
that contains the raw data. We already have a parameters.json file in our local folder and setting the orig_fname
keyword argument to True would result in a clash in the file name.
Just to prove that the file download is indeed taking place, let’s check to make sure that there is no other JSON file whose name matches that of the record ID.
expected_file_name = os.path.join('.', record_id.split('d/')[-1]) + '.json'
print(expected_file_name)
./34682319.json
print(os.path.exists(expected_file_name))
False
Now that we know that we will not be having a file name clash, let us proceed with the dataGet() function call.
Note
The current version of DataFed has a bug where dataGet() only accepts a list of Data Record or Collection IDs.
Until the next version, users are recommended to put their singular ID into a list for dataGet().
get_resp = df_api.dataGet([record_id], # currently only accepts a list of IDs / aliases
                          '.', # directory where data should be downloaded
                          orig_fname=False, # do not name file by its original name
                          wait=True, # Wait until Globus transfer completes
                         )
print(get_resp)
(task {
  id: "task/34682556"
  type: TT_DATA_GET
  status: TS_SUCCEEDED
  client: "u/somnaths"
  step: 2
  steps: 3
  msg: "Finished"
  ct: 1611077310
  ut: 1611077320
  source: "d/34682319"
  dest: "olcf#dtn/gpfs/alpine/stf011/scratch/somnaths/DataFed_Tutorial"
}
, 'TaskDataReply')
The response shows that the Globus file transfer to the local file system did indeed complete successfully. Now, let us verify that the file does indeed exist as it should:
print(os.path.exists(expected_file_name))
True
At this point, we are free to rename the downloaded file to whatever name we want using familiar python functions:
os.rename(expected_file_name, 'duplicate_parameters.json')
Tasks
DataFed makes it possible to check on the status of transfer tasks in an easy and programmatic manner.
From the earlier dataGet() function call’s response, we can extract the task id as:
task_id = get_resp[0].task[0].id
print(task_id)
task/34682556
Using the task ID, we can check on the status of the task via the taskView() function:
task_resp = df_api.taskView(task_id)
print(task_resp)
(task {
  id: "task/34682556"
  type: TT_DATA_GET
  status: TS_SUCCEEDED
  client: "u/somnaths"
  step: 2
  steps: 3
  msg: "Finished"
  ct: 1611077310
  ut: 1611077320
  source: "d/34682319"
  dest: "olcf#dtn/gpfs/alpine/stf011/scratch/somnaths/DataFed_Tutorial"
}
, 'TaskDataReply')
The TaskDataReply shows that the status is indeed a success and the msg is "Finished".
This specific example by itself was trivial since we had set the wait keyword argument to True in the dataGet() function
call, which meant that DataFed would not proceed until the transfer was complete.
Furthermore, the nature of the transfer was also trivial in that it was a single file located in a single DataFed
repository being delivered to a single destination.
Note
A DataFed task may itself contain / be responsible for several Globus file transfers.
As the structure of the dataGet() function call suggests, one could request that several Data Records or
Data Collections (themselves containing thousands of Data Records or even Collections) be downloaded,
regardless of their location (several DataFed data repositories spread across the world in multiple institutions / continents).
In this case, the task would be a composite of several Globus data transfers.
We can also extract the status of the task as:
task_resp[0].task[0].status
3
Note that though the status was marked as TS_SUCCEEDED in the Google Protobuf object,
we got an integer value for the status.
For now, we will use the numeric value of 3 to denote the successful completion of a file transfer task.
Note
A future version of DataFed may change the nature of the output / type for the status
property. In general, the exact return object types and nomenclature may evolve with DataFed.
Asynchronous transfers
So far we have been requesting that all transfers be completed before the next line of python code is executed. This is certainly acceptable for small data files but is perhaps not ideal for large files.
Here are some scenarios:
We are performing an array of simulations and want data transfers for a completed simulation to take place in the background while the subsequent simulation is being computed.
We may want to get multiple Data Records or Collections which may actually be spread over multiple DataFed data repositories or Projects, etc.
One could conceivably need to launch a child process to perform some operations while transfers took place asynchronously.
Before we demonstrate a simple example, let us define some handy functions:
The first is our fake, computationally expensive simulation denoted by expensive_simulation() that just sleeps for 3 seconds.
It generates results that are written to a .dat file and it returns the path to this
results data file. Though comically oversimplified, it is sufficiently accurate for demonstration purposes.
def expensive_simulation():
    time.sleep(3)
    # Yes, this simulation is deterministic and always results in the same result:
    path_to_results = 'esnet#cern-diskpt1/data1/5MB-in-tiny-files/a/a/a-a-1KB.dat'
    return path_to_results
The next handy function is check_xfer_status() that looks up the instantaneous status of the transfer
of each task it is provided and returns only the statuses:
def check_xfer_status(task_ids):
    # Create a list to hold all statuses
    statuses = list()
    # iterate over each of the task IDs in the input argument
    for this_task_id in task_ids:
        # First ask DataFed for information about this task
        task_resp = df_api.taskView(this_task_id)
        # Extract the status field from the response
        # Add just the status to the list
        statuses.append(task_resp[0].task[0].status)
    return statuses
In the following demonstration, we perform a series of “computationally expensive” simulations.
Following our aim to mimic realistic scenarios, we also create a DataFed collection to hold all the simulation results:
coll_resp = df_api.collectionCreate('Simulations', parent_id=dest_collection)
sim_coll_id = coll_resp[0].coll[0].id
Knowing that the simulations take a while to complete,
we create a Data Record to hold each simulation’s resulting data file and then call dataPut()
to asynchronously upload the data in the background without impeding the following simulation
or, importantly - wasting precious wall time on the supercomputer.
xfer_tasks = list()
for ind in range(3):
    print('Starting simulation #{}'.format(ind))
    # Run the simulation and make sure to get the path to the results
    results_file = expensive_simulation()
    # Create a unique Data Record for this simulation
    rec_resp = df_api.dataCreate('Simulation_' + str(ind),
                                 metadata=json.dumps({'parameter_1': ind}),
                                 parent_id=sim_coll_id)
    # Extract the ID for this record from the response
    this_rec_id = rec_resp[0].data[0].id
    print('Uploading data from simulation #{}'.format(ind))
    # Put the raw data into this record
    put_resp = df_api.dataPut(this_rec_id, results_file, wait=False)
    # Extract the task ID from the put response as we have done before
    # Add that task ID to the list of tasks we need to track
    xfer_tasks.append(put_resp[0].task.id)
    # Print instantaneous transfer statuses of all data put tasks so far
    print('Transfer status(es): {}'.format(check_xfer_status(xfer_tasks)))
    print('')

print('Simulations complete')
Starting simulation #0
Uploading data from simulation #0
Transfer status(es): [2]

Starting simulation #1
Uploading data from simulation #1
Transfer status(es): [3, 2]

Starting simulation #2
Uploading data from simulation #2
Transfer status(es): [3, 3, 2]

Simulations complete
What we observe is that the data upload transfer task for all previous simulations are complete while the current simulation is in progress. Of course, the sequence and competing speeds of the simulation and the data transfer tasks will vary from one workload to another and this is just an illustration. However, it does illustrate a popular use-case for asynchronous file transfers.
Note
Users are recommended to perform data orchestration (especially large data movement - upload / download) operations outside the scope of heavy / parallel computation operations in order to avoid wasting precious wall time on compute clusters.
Task list
DataFed also provides the taskList() function that displays a list of all
data upload or download tasks in descending order of time since creation.
This may be useful for those who are developing applications where one needs ot check on
and manage tasks initiated, for example, from different python sessions (either in the past or running elsewhere)
Collections
Collections are a great tool for organizing Data Records and other Collections within DataFed. Besides organization, they have other benefits such as facilitating the download of vast numbers of Data Records they may contain, regardless of where (DataFed data repositories, various projects, etc.) the individual Data Records are physically located.
Create collection
The process to create a Collection is very similar to that for the Data Record.
We would use the collectionCreate() function as:
coll_alias = 'cat_dog_train'
coll_resp = df_api.collectionCreate('Image classification training data',
alias=coll_alias,
parent_id=dest_collection)
print(coll_resp)
(coll {
  id: "c/34683877"
  title: "Image classification training data"
  alias: "cat_dog_train"
  owner: "p/trn001"
  ct: 1611078472
  ut: 1611078472
  parent_id: "c/34558900"
}
, 'CollDataReply')
Much like Data Records, Collections can be addressed using aliases instead of IDs.
However, as mentioned earlier, we would always need to specify the context for the alias.
What we get in response to the collectionCreate() function is a CollDataReply object.
It contains some high-level identification information such as the id, alias, parent_id, etc.
It does not contain other information such as the number of Data Records within the collection itself.
We could peel the id of this newly created Collection out of the message reply if we wanted to,
just as we did for the Data Record. However, we will just use the alias for now.
Note
Collections have IDs starting with c/ just like Data Record IDs start with d/
and Project IDs start with p/.
Populate with Records
Let’s say that we wanted to put training data for a machine learning application into this collection.
We could go ahead and populate the Collection with Data Records by using the dataCreate() function
for each Data Record in the Collection.
In our example, we are interested in gathering examples of cats and dogs to train a machine learning model.
For simplicity, we will use the same tiny dataset for both cats and dogs.
The Data Records would be distinguishable via the animal key or field in the metadata.
Since we need to create several Data Records for dogs and cats, we will define a quick function:
import random

def generate_animal_data(is_dog=True):
    this_animal = 'cat'
    if is_dog:
        this_animal = 'dog'
    # To mimic a real-life scenario, we append a number to the animal type to denote
    # the N-th example of a cat or dog. In this case, we use a random integer.
    rec_resp = df_api.dataCreate(this_animal + '_' + str(random.randint(1, 100)),
                                 metadata=json.dumps({'animal': this_animal}),
                                 parent_id=coll_alias)
    # Parse the dataCreate response to tease out the ID of the Record
    this_rec_id = rec_resp[0].data[0].id
    # path to the file containing the raw data
    raw_data_path = 'esnet#newy-dtn/data1/5MB-in-tiny-files/a/a/a-a-1KB.dat'
    # Putting the raw data into the record
    put_resp = df_api.dataPut(this_rec_id, raw_data_path)
    # Only returning the ID of the Data Record we created:
    return this_rec_id
In the above function, we use a tiny dataset from ESNet’s read-only Globus endpoint: esnet#newy-dtn.
The actual data itself is of little relevance to this example and will not really be used.
Tip
So far, we have only been providing the relative path to data when we use dataCreate().
dataCreate() automatically gets the absolute path of the path in the local file system
and takes the UUID / legacy name of the Globus endpoint we set as default for this local file system.
However, we can also provide the name of the Globus endpoint followed by the absolute path of the desired file (or directory) from that Globus endpoint.
Now, we simply call the generate_animal_data() function to generate data.
We will generate 5 examples each of cats and dogs:
cat_records = list()
dog_records = list()
for _ in range(5):
    dog_records.append(generate_animal_data(is_dog=True))
for _ in range(5):
    cat_records.append(generate_animal_data(is_dog=False))
print(cat_records)
['d/34684011', 'd/34684035', 'd/34684059', 'd/34684083', 'd/34684107']
print(dog_records)
['d/34683891', 'd/34683915', 'd/34683939', 'd/34683963', 'd/34683987']
List items in Collection
Now that we have generated the data into our Collection, we can list the contents of the Collection
simply via collectionItemList() as shown below.
Since we set the context earlier in the guide, we do not need to specify the context
keyword argument though we are using the alias as the identifier:
coll_list_resp = df_api.collectionItemsList(coll_alias)
print(coll_list_resp)
(item {
  id: "d/34684107"
  title: "cat_22"
  owner: "p/trn001"
  creator: "u/somnaths"
  size: 0.0
  notes: 0
}
item {
  id: "d/34684011"
  title: "cat_32"
  owner: "p/trn001"
  creator: "u/somnaths"
  size: 0.0
  notes: 0
}
item {
  id: "d/34684035"
  title: "cat_6"
  owner: "p/trn001"
  creator: "u/somnaths"
  size: 0.0
  notes: 0
}
item {
  id: "d/34684083"
  title: "cat_93"
  owner: "p/trn001"
  creator: "u/somnaths"
  size: 0.0
  notes: 0
}
item {
  id: "d/34684059"
  title: "cat_96"
  owner: "p/trn001"
  creator: "u/somnaths"
  size: 0.0
  notes: 0
}
item {
  id: "d/34683939"
  title: "dog_3"
  owner: "p/trn001"
  creator: "u/somnaths"
  size: 0.0
  notes: 0
}
item {
  id: "d/34683915"
  title: "dog_63"
  owner: "p/trn001"
  creator: "u/somnaths"
  size: 0.0
  notes: 0
}
item {
  id: "d/34683891"
  title: "dog_70"
  owner: "p/trn001"
  creator: "u/somnaths"
  size: 0.0
  notes: 0
}
item {
  id: "d/34683987"
  title: "dog_71"
  owner: "p/trn001"
  creator: "u/somnaths"
  size: 0.0
  notes: 0
}
item {
  id: "d/34683963"
  title: "dog_8"
  owner: "p/trn001"
  creator: "u/somnaths"
  size: 0.0
  notes: 0
}
offset: 0
count: 20
total: 10
, 'ListingReply')
From the above response, it is clear that we have 5 examples each for dogs and cats and that this Collection does not contain any other Collections or Data Records.
Note
If we had several dozens, hundreds, or even thousands of items in a Collection,
we would need to call collectionItemsList() multiple times
by stepping up the offset keyword argument each time to get the next “page” of results.
Queries
Let’s say that we want to segregate the cat data from the dog data and that
we did not already have the record IDs separated in the dog_records and cat_records variables.
One way to do this with the tools we have demonstrated so far might be to
use collectionItemsList() to enumerate all the records, extract the title of each of the Records
and then parse the information to separate cats from dogs.
If we did not have meaningful titles, we would have had to call dataView() to get the metadata
of each of the Records to separate cats from dogs.
Obviously, these are highly sub-optimal solutions to the problem. The ideal solution is to use the search capability in DataFed.
Create query
While it is technically possible to construct queries using the queryCreate() function in CommandLib,
we will construct the query via the web interface since the query language will be changed soon, as of this writing.
Note
The query language is likely to change in a future version of DataFed.
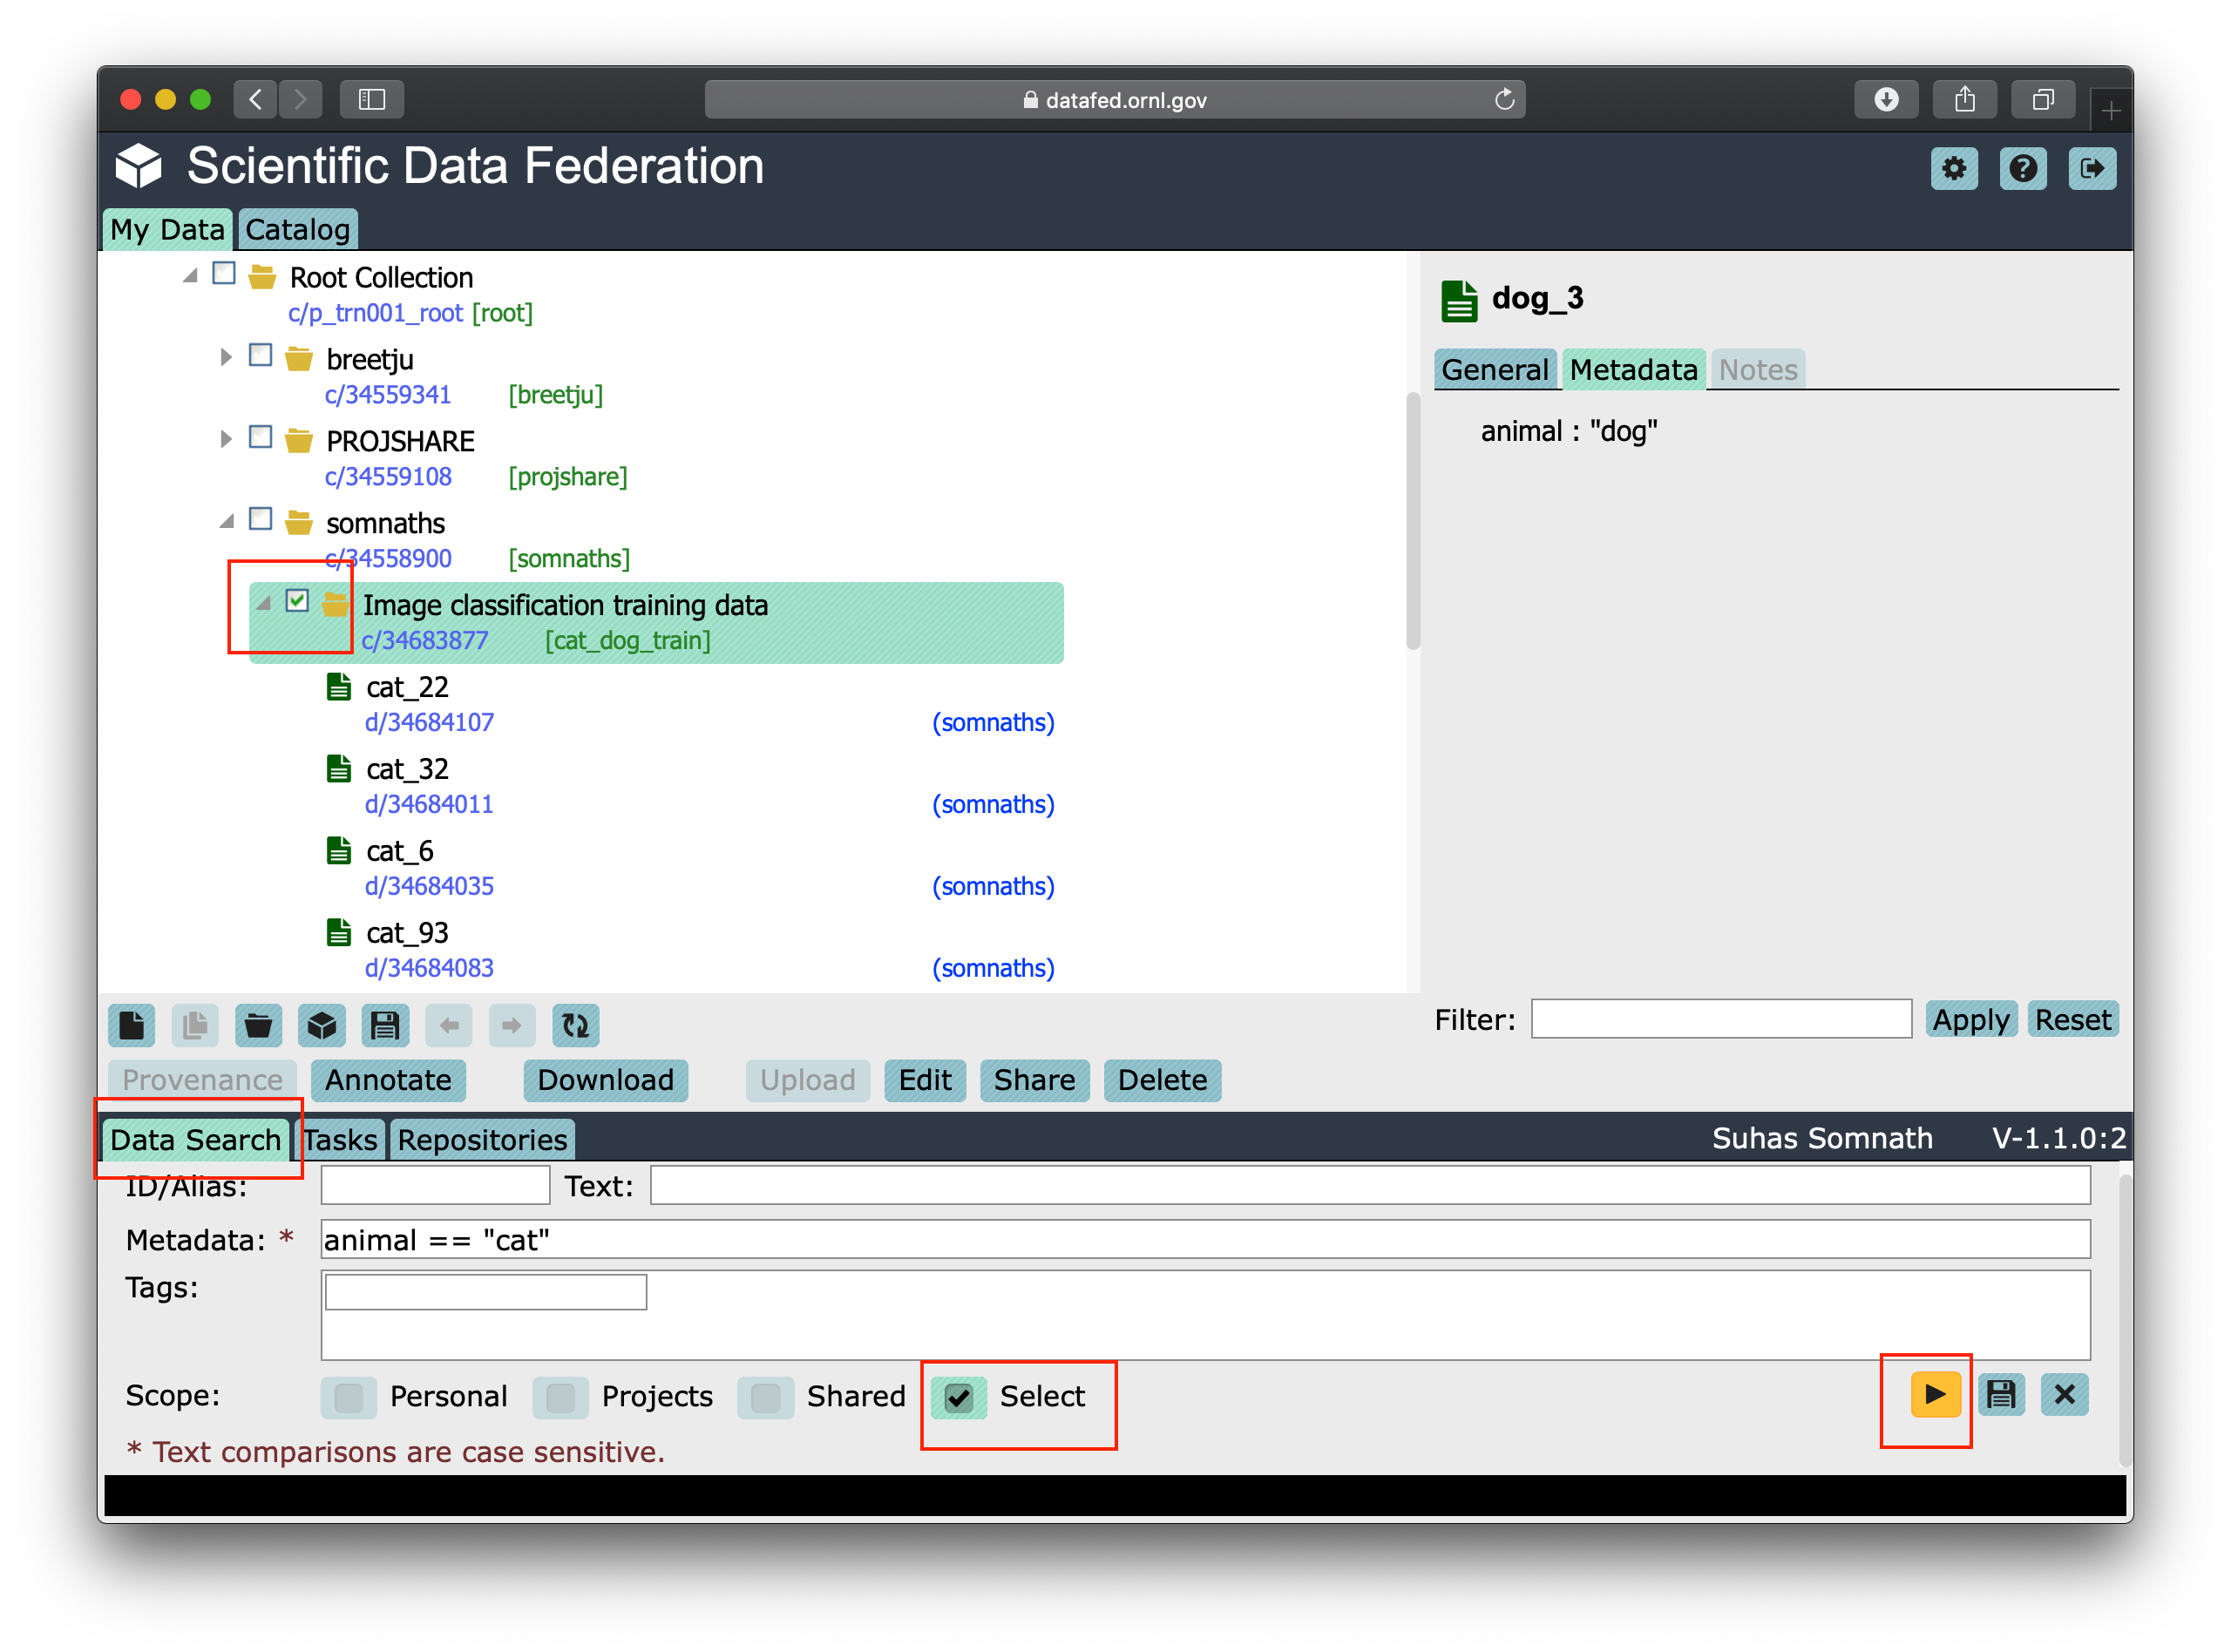
In order to create the query, we will follow the subsequent steps and the screenshot of the interface below should help guide you through this process:
visit https://datafed.ornl.gov
Click on the
Data Searchtab in the bottom left of the page to expand the search tab.Uncheck all boxes in the
Scopeand only check theSelect. This should reveal checkboxes in the left navigation panel.Now select the
Image Classification and Training datacollectionFinally, enter
animal == "cat"in theMetadatafield in theData Searchtab in the bottom of the window
Your window should look something like this:
Now when we click the yellow colored right arrow / “play” button in the bottom right of the Data Search tab,
we are taken to the search results page as shown below:
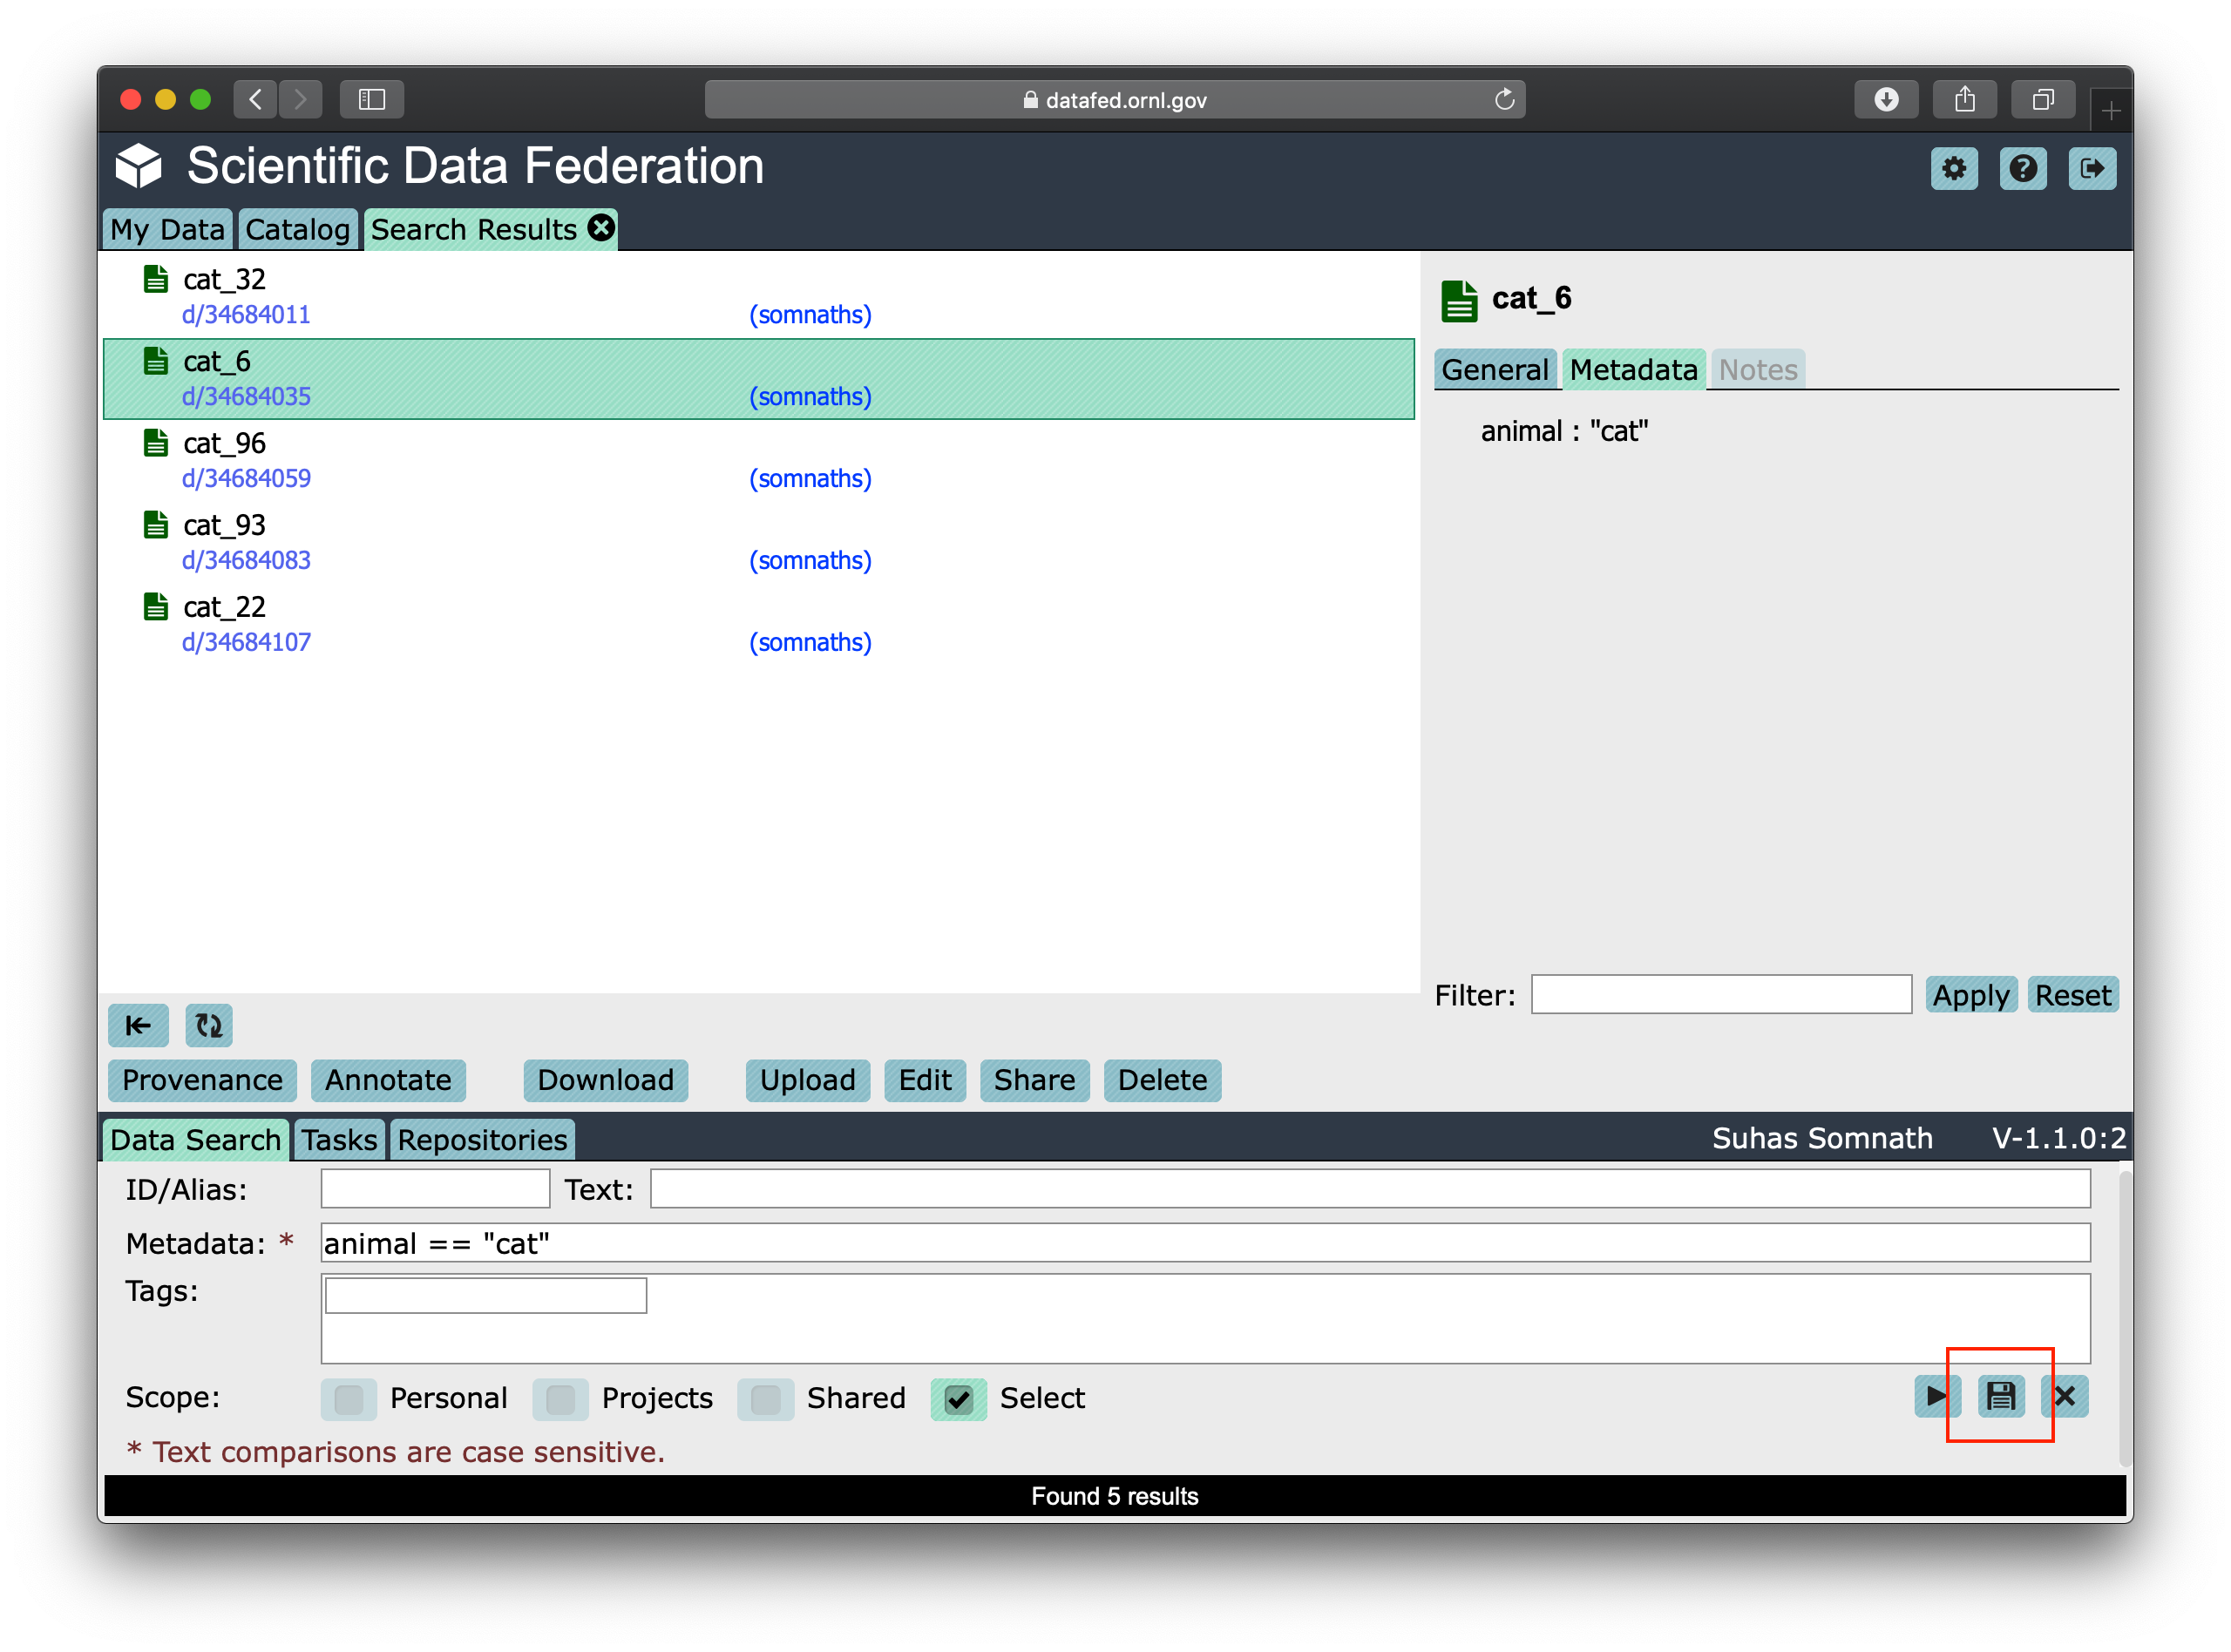
Click on the Save button that looks like a floppy drive in the bottom right of the Data Search tab.
This should reveal a pop up window that will let you name and save this search query as shown below:
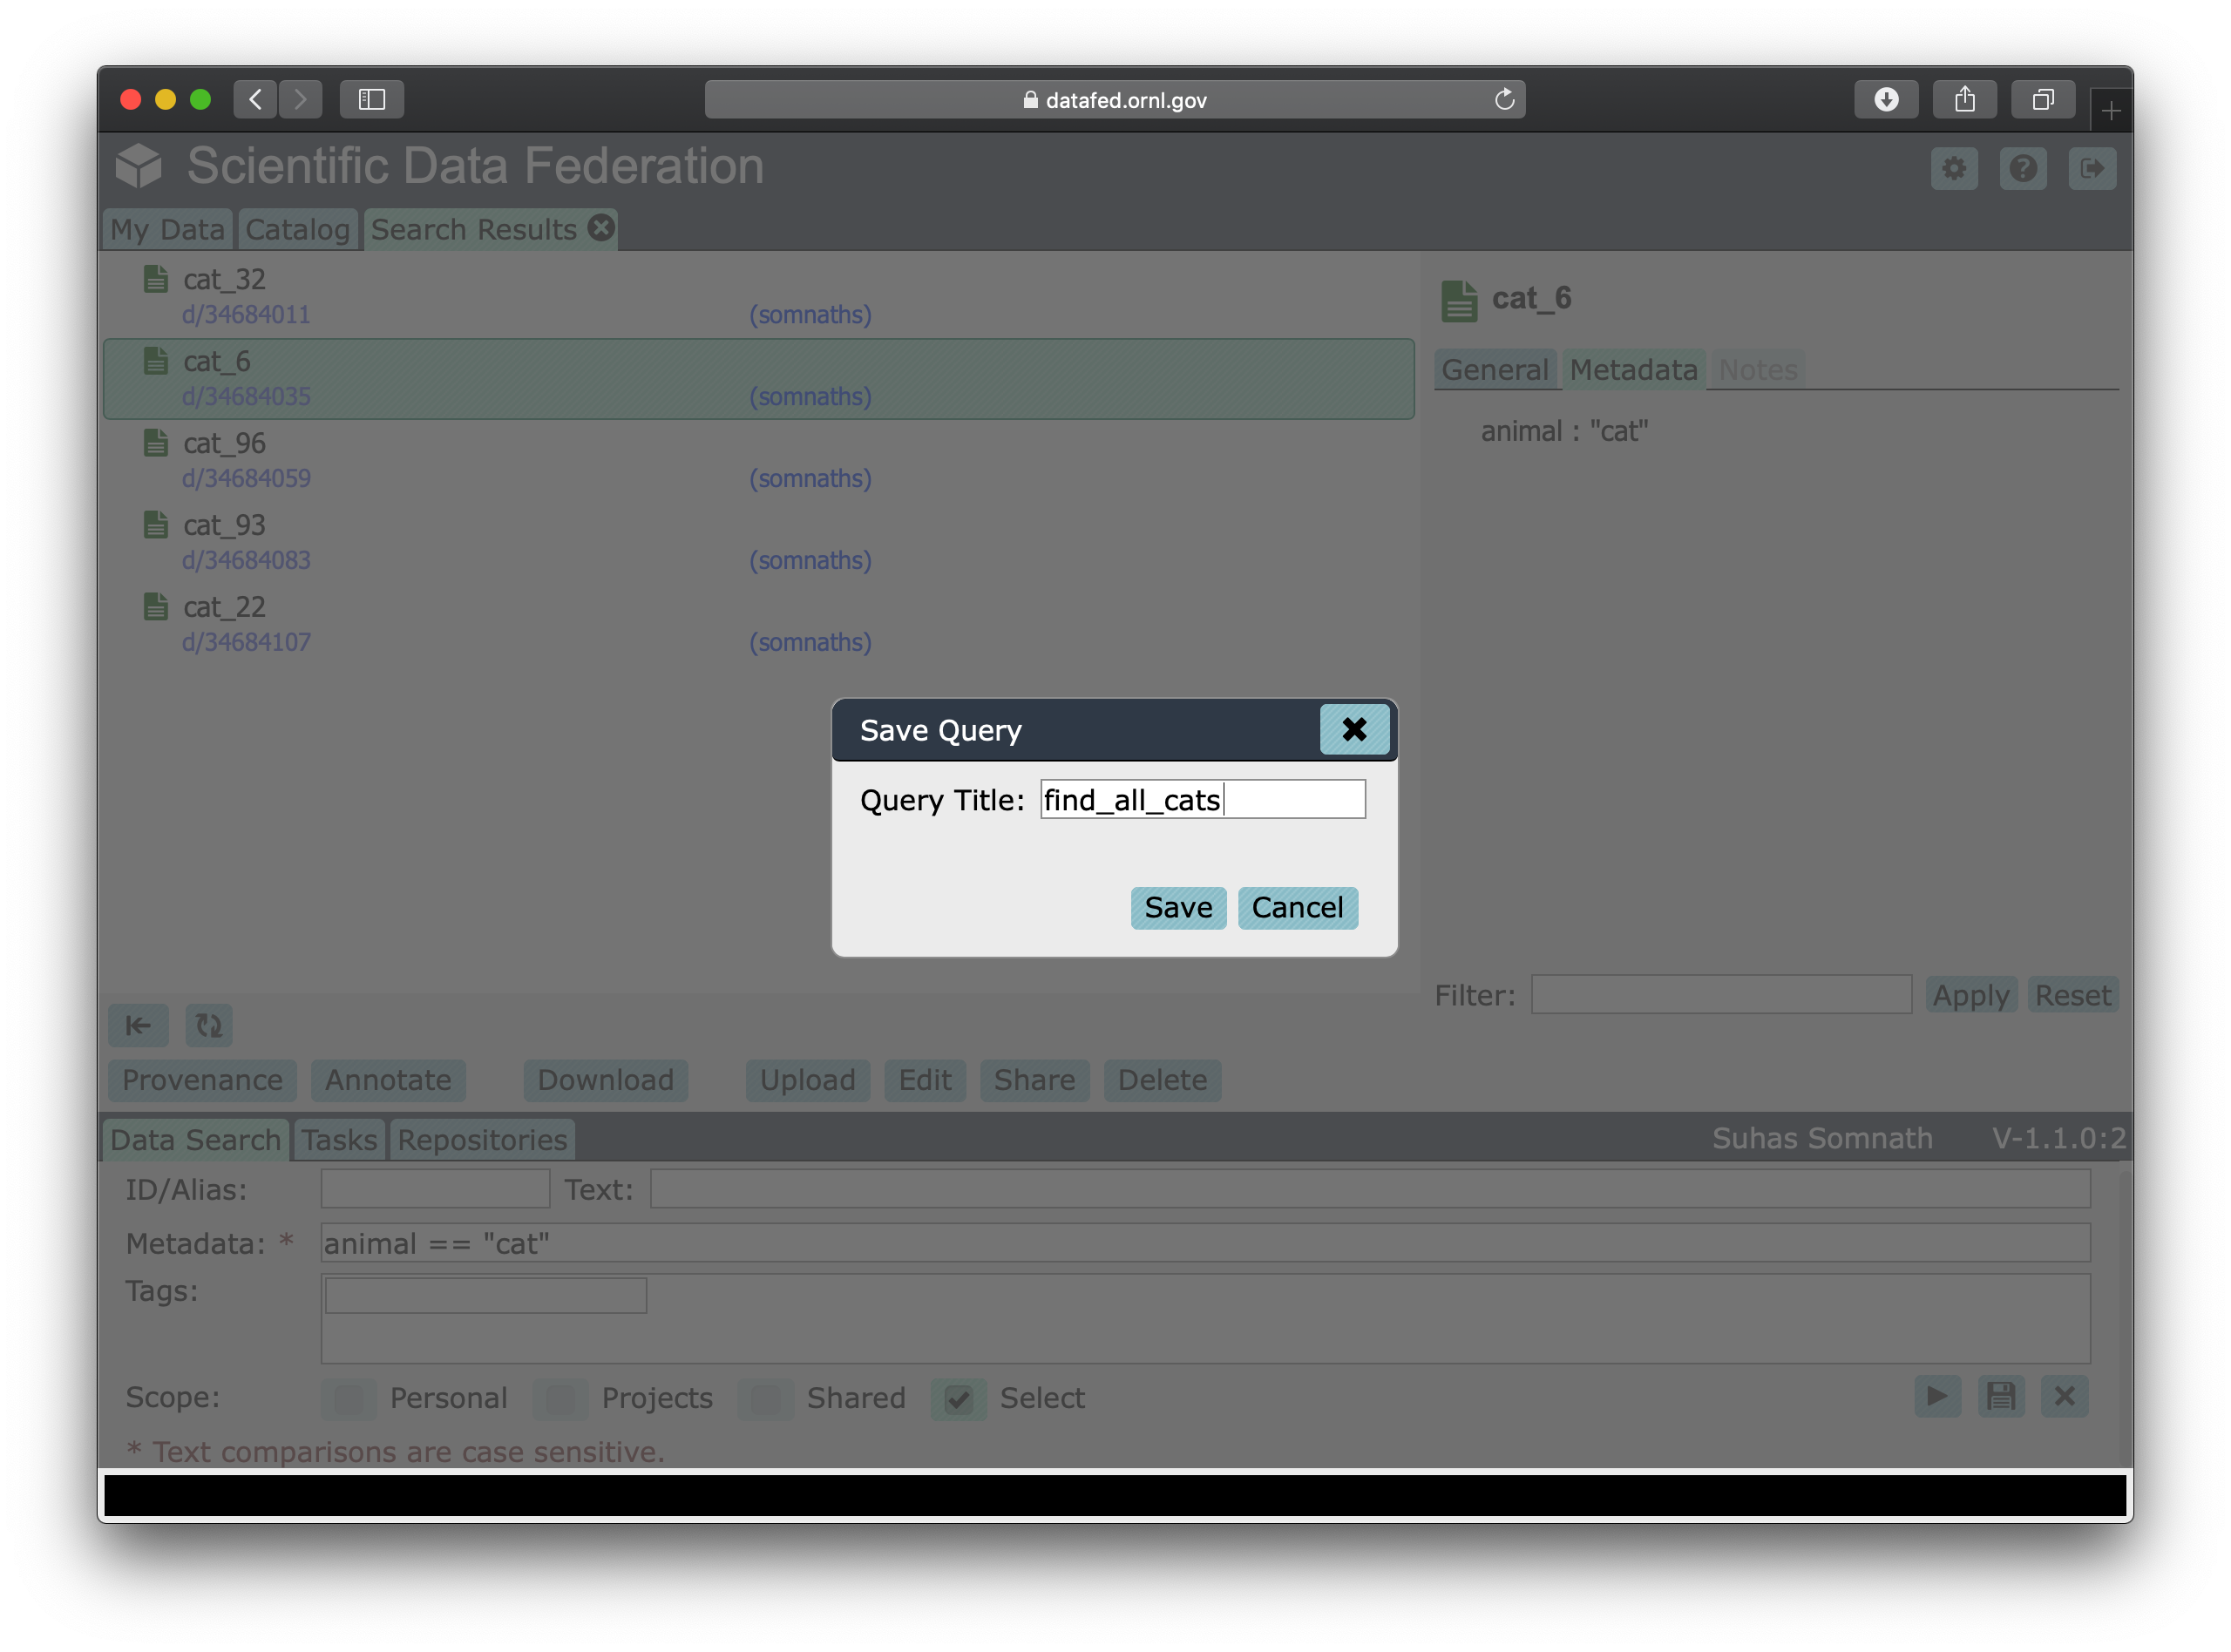
We can give this search a title such as find_all_cats and click on the Save button now.
Note
Saved queries are visible at the very bottom of the navigation / left pane below Project Data and Shared Data.
List saved queries
Much like listing the Projects this user is part of or the contents of a Collection, one can also list the
saved queries via the queryList() function as:
ql_resp = df_api.queryList()
print(ql_resp)
(item {
   id: "q/34684970"
   title: "find_all_cats"
 }
 offset: 0
 count: 20
 total: 1, 'ListingReply')
We again get a ListingReply object which can be parsed if need be.
Importantly, we see our newly created query listed here.
We can extract the query ID as:
query_id = ql_resp[0].item[0].id
print(query_id)
'q/34684970'
View query
Just like dataView(), we can view use queryView() to view this query as well:
df_api.queryView(query_id)
(query {
   id: "q/34684970"
   title: "find_all_cats"
   query: "{\"meta\":\"animal == \\\"cat\\\"\",\"scopes\":[{\"scope\":4,\"id\":\"c/34683877\",\"recurse\":true}]}"
   owner: "u/somnaths"
   ct: 1611078781
   ut: 1611078781
 }, 'QueryDataReply')
The query string in the response reveals that:
we did search for data whose metadata lists their
animalascat.we limited our
scopeto just one collection(by default) the query recursively searches all collections inside the collection we pointed out.
Execute query
Finally, we can run the desired query using queryExec() as shown below:
query_resp = df_api.queryExec(query_id)
print(query_resp)
(item {
  id: "d/34684011"
  title: "cat_32"
  owner: "p/trn001"
  creator: "u/somnaths"
  size: 1000.0
  notes: 0
}
item {
  id: "d/34684035"
  title: "cat_6"
  owner: "p/trn001"
  creator: "u/somnaths"
  size: 1000.0
  notes: 0
}
item {
  id: "d/34684059"
  title: "cat_96"
  owner: "p/trn001"
  creator: "u/somnaths"
  size: 1000.0
  notes: 0
}
item {
  id: "d/34684083"
  title: "cat_93"
  owner: "p/trn001"
  creator: "u/somnaths"
  size: 1000.0
  notes: 0
}
item {
  id: "d/34684107"
  title: "cat_22"
  owner: "p/trn001"
  creator: "u/somnaths"
  size: 1000.0
  notes: 0
}
, 'ListingReply')
The response to this function call is also a ListingReply object.
Note
In the current version of DataFed, the search query limits the number of results it returns from queries to 50. This behavior will be changed in a subsequent version of DataFed.
Let’s verify that the results from the query match our expectation (the list of cat IDs we collected when the records were created):
# First get IDs from query result
cat_rec_ids = [record.id for record in query_resp[0].item]
print(set(cat_rec_ids) == set(cat_records))
True
Collections continued
Let us continue with our original aim of segregating the cats from the dogs. We now know the IDs of all the cats from the response to a saved query.
Now, we will demonstrate ways in which we can organize data in DataFed.
Organize with Collections
The simplest and most powerful way to organize information is using Collections.
We could segregate all cat data into a new, separate collection just for cats via the collectionCreate() function:
coll_resp = df_api.collectionCreate('Cats', alias='cats', parent_id=coll_alias)
cat_coll_id = coll_resp[0].coll[0].id
print(cat_coll_id)
'c/34685092'
Collection Parents
If we wanted to get an idea about where the newly created Cats Collection is
with respect to the root Collection of the current context (the Training project),
we could use the collectionGetParents() function as:
path_resp = df_api.collectionGetParents(cat_coll_id)
print(path_resp)
(path {
   item {
     id: "c/34683877"
     title: "Image classification training data"
     alias: "cat_dog_train"
   }
   item {
     id: "c/34558900"
     title: "somnaths"
     alias: "somnaths"
   }
   item {
     id: "c/p_trn001_root"
     title: "Root Collection"
     alias: "root"
   }
 }, 'CollPathReply')
What we get in return is a CollPathReply message which essentially shows a
path illustrating that the Cats Collection is within the cat_dog_train Collection,
which itself is within the user’s private collection - somnaths, which in turn
is within the root Collection of the Training Project.
Add and remove from Collections
Unlike before when we created the cat and dog records into a specific Collection, we now already have the cat Records in the incorrect Collection.
The first step towards organization is to add these existing records into the newly created
Cats Collection via the collectionItemsUpdate() function as shown below.
This function accepts a list of IDs to add via the add_ids keyword argument:
cup_resp = df_api.collectionItemsUpdate(cat_coll_id, add_ids=cat_rec_ids)
print(cup_resp)
(, 'ListingReply')
Unlike most other functions, collectionItemsUpdate() does not return much that we can work with.
However, this is acceptable since we knew the IDs being added into the Collection.
We can verify that the cat Records do indeed exist in the Cats Collection using
the familiar collectionItemsList() function as shown below.
In the interest of brevity, we capture the response and only print out ID and title of the items in the collection:
ls_resp = df_api.collectionItemsList(cat_coll_id)
print([(obj.id, obj.title) for obj in ls_resp[0].item])
[('d/34684107', 'cat_22'),
 ('d/34684011', 'cat_32'),
 ('d/34684035', 'cat_6'),
 ('d/34684083', 'cat_93'),
 ('d/34684059', 'cat_96')]
We have indeed ensured that the cat Records are part of the Cats Collection.
However, let us list the contents of the original / outer collection:
ls_resp = df_api.collectionItemsList(coll_alias)
print([(obj.id, obj.title) for obj in ls_resp[0].item])
[('c/34685092', 'Cats'),
 ('d/34684107', 'cat_22'),
 ('d/34684011', 'cat_32'),
 ('d/34684035', 'cat_6'),
 ('d/34684083', 'cat_93'),
 ('d/34684059', 'cat_96')
 ('d/34683939', 'dog_3'),
 ('d/34683915', 'dog_63'),
 ('d/34683891', 'dog_70'),
 ('d/34683987', 'dog_71'),
 ('d/34683963', 'dog_8')]
We observe that the original collection continues to contain the cat Records, as well as the newly
created Cats collection, and all the dog Records.
To complete the move, we need to de-link the cat Records from the original Collection.
We do this again via the collectionsItemsUpdate() function.
However, this time, we would need to pass the same cat Record IDs with the rem_ids keyword argument
rather than the add_ids keyword argument:
cup_resp = df_api.collectionItemsUpdate(coll_alias, rem_ids=cat_rec_ids)
print(cup_resp)
(, 'ListingReply')
Let us verify that the original / outer Collection no longer contains cat Records:
ls_resp = df_api.collectionItemsList(coll_alias)
print([(obj.id, obj.title) for obj in ls_resp[0].item])
[('c/34685092', 'Cats'),
 ('d/34683939', 'dog_3'),
 ('d/34683915', 'dog_63'),
 ('d/34683891', 'dog_70'),
 ('d/34683987', 'dog_71'),
 ('d/34683963', 'dog_8')]
Download Collection
Finally, let us assume that we are interested in only downloading the data from all
cat Records.
A naive and suboptimal way to accomplish this is to perform 5 separate dataGet() function calls - one per cat Record.
Fortunately, the dataGet() function allows multiple Records or entire Collections to be downloaded with a single function call
as shown below.
Though we could provide the list of cat Record IDs, we will only provide the Cat Collection ID instead.
We will ask dataGet() to create a new directory called cat_data and put all the data within this directory:
df_api.dataGet([cat_coll_id], './cat_data')
(item {
   id: "d/34684011"
   title: "cat_32"
   owner: "p/trn001"
   size: 1000.0
 }
 item {
   id: "d/34684035"
   title: "cat_6"
   owner: "p/trn001"
   size: 1000.0
 }
 item {
   id: "d/34684059"
   title: "cat_96"
   owner: "p/trn001"
   size: 1000.0
 }
 item {
   id: "d/34684083"
   title: "cat_93"
   owner: "p/trn001"
   size: 1000.0
 }
 item {
   id: "d/34684107"
   title: "cat_22"
   owner: "p/trn001"
   size: 1000.0
 }
 task {
   id: "task/34685359"
   type: TT_DATA_GET
   status: TS_READY
   client: "u/somnaths"
   step: 0
   steps: 2
   msg: "Pending"
   ct: 1611079028
   ut: 1611079028
   source: "d/34684011, d/34684035, d/34684059, d/34684083, d/34684107, ..."
   dest: "olcf#dtn/gpfs/alpine/stf011/scratch/somnaths/DataFed_Tutorial/cat_data"
 }, 'DataGetReply')
Note
Recall that dataGet() can download arbitrarily large number of Records
regardless of the physical locations of the DataFed repositories containing the data.
Now, let us verify that all the data does in fact exist in this newly created directory in the local file system:
os.listdir('./cat_data')
['34684107.dat',
 '34684059.dat',
 '34684011.dat',
 '34684035.dat',
 '34684083.dat']
Other functions
Besides the above functions, DataFed offers the collectionDelete() function,
which, as the name suggests, facilitates in deleting one or more collections and all other
objects within the collection (So long as the items do not also belong to other collections elsewhere).
Closing remarks
This user guide only provides an overview of some functions in DataFed that would be used most popularly.
The interested user is encouraged to go over the complete documentation of all the functions in CommandLib.CLI
here.